Timber Framing Step-by-Step: A Guide for Aussie Builders
Timber framing is at the heart of Australian construction, offering strength, versatility, and sustainability. Whether you’re building a granny flat or a multi-story home, following the correct steps ensures a durable, compliant, and efficient structure.
However, the process can be challenging without proper planning and accurate material estimation. One of the first things to do as a builder or carpenter, is to determine the timber required for the frame.
This guide breaks down timber framing step-by-step for Aussie builders and chippies, showing how to get it right every time. Plus, we’ll explore how TimberTec, a revolutionary timber estimation tool, can streamline the process, saving you time and effort.

Step 1: Planning and Preparation
Timber framing starts long before the first nail is driven. Proper planning and preparation lay the foundation for a successful project.
Read the Plans
Start by carefully reviewing the architectural and engineering plans. Identify key elements such as wall heights, spans, and load requirements. Check for specific notes regarding compliance with the Australian Standard AS 1684 (Timber Framing Code).
Measure Twice, Cut Once
Accurate measurements are critical. Double-check dimensions to ensure they match the plans and account for any site-specific variations.
Select the Right Materials
Choose timber species and grades suitable for the project. Factors such as durability, strength, and environmental conditions will influence your choices. Refer to span tables to determine the correct sizes for beams, lintels, and studs.
Internal Link: [5 Common Mistakes to Avoid in Manual Material Takeoffs]
Step 2: Marking and Layout
Once planning is complete, it’s time to mark and lay out the timber frame.
Marking Out the Frame
Use chalk lines and measuring tools to mark the positions of walls, openings, and key structural components. This ensures everything is in the right place before cutting begins.
Identify Load-Bearing Walls
Highlight load-bearing walls on the layout. These walls support roof and floor loads, requiring correctly sized studs, beams, and bracing for structural integrity.
Pre-Cutting Materials
Pre-cut timber components to size based on the marked layout. Double-check measurements to minimize waste and ensure precise fits.
Step 3: Assembling the Frame
With your materials prepared, it’s time to assemble the timber frame.
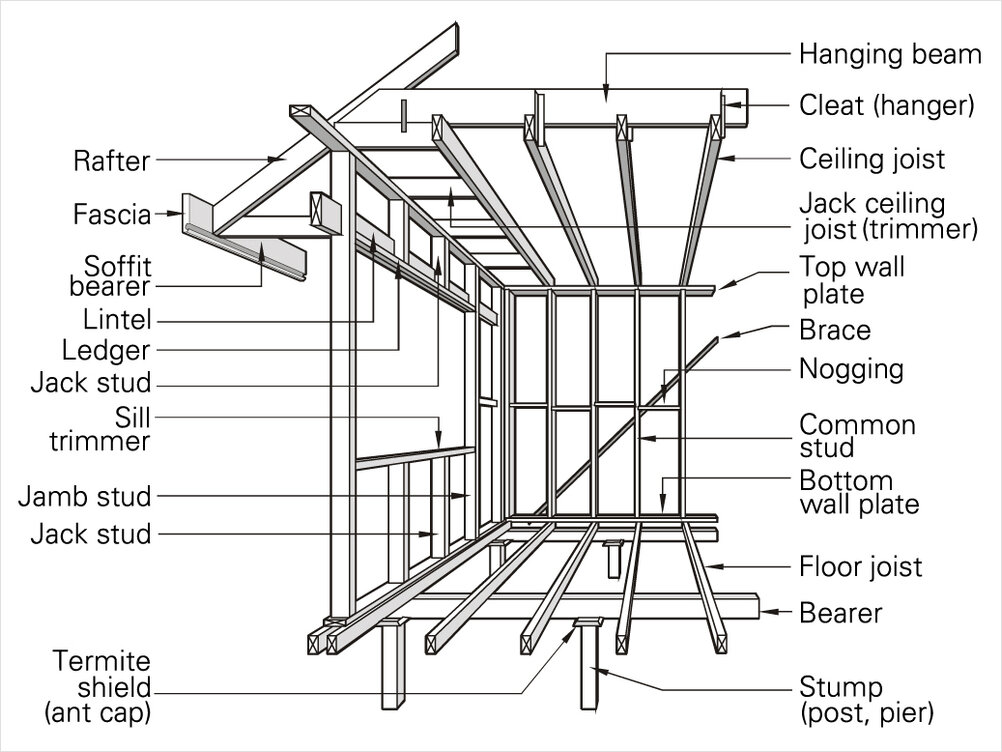
Start with the Bottom Plate
Secure the bottom plate to the foundation, ensuring it is level and aligned with the layout. Fix it in place using anchors or bolts.
Fix the Studs
Attach studs vertically to the bottom plate, spacing them as specified in the plans. Use a nail gun or screws to secure them. For load-bearing walls, reinforce studs with noggings to provide additional strength.
Add the Top Plate
Once the studs are in place, fix the top plate to create the frame’s upper boundary. Ensure it is securely fastened and aligned with the bottom plate.
Please see the details: How TimberTec Takes the Guesswork Out of Timber Estimation
Step 4: Bracing and Compliance
Bracing is essential for stability and compliance with AS 1684.
Install Bracing Elements
Install bracing elements such as diagonal braces, tie-downs, and truss bracing to reinforce the frame against wind loads and lateral forces.
Check Compliance
Ensure all components meet the Australian Standard AS 1684 requirements. Double-check span tables and load calculations to avoid issues during inspections.
Use TimberTec for Accuracy
TimberTec simplifies compliance by automating material calculations based on AS 1684 standards. Its AI-powered algorithms ensure you’re using the right materials in the right quantities, reducing the risk of errors and rework.
External Link: Australian Timber Design Guide for LVL Beams
Step 5: Final Checks and Adjustments
Before moving on to cladding or roofing, perform a thorough check of the timber frame.
Inspect All Connections
Check all nails, screws, and bolts to ensure they are secure and correctly placed. Replace or reinforce any components that appear loose or misaligned.
Verify Dimensions
Confirm that the frame aligns with the plans, ensuring all walls, openings, and structural elements are correctly positioned.
Prepare for the Next Phase
Once satisfied with the frame, prepare the structure for cladding, insulation, or roofing. Store extra materials safely for future use.

Questions & Answers
Q1: How does TimberTec help with timber framing projects?
A: TimberTec automates material estimations, ensuring accurate quantities for beams, studs, and other components. It eliminates manual errors and simplifies compliance with AS 1684.
Q2: Can TimberTec handle complex residential projects?
A: Absolutely. TimberTec is designed for projects of all sizes, from small renovations to large residential builds.
Q3: Is Timbertec easy to use?
A: Yes, TimberTec is built by people in the industry, and have made it as clear and easy to use as possible. You will be surprised at how easy it is to use.
Q4: Why is bracing important in timber framing?
A: Bracing provides stability and ensures the structure can withstand lateral forces, such as wind loads, as required by AS 1684.
Conclusion
Timber framing is a skill that requires precision, planning, and adherence to standards. By following these steps—planning, marking, assembling, bracing, and finalizing—you can build strong, compliant structures that stand the test of time.
However, even the best chippies can save time and reduce errors with tools like TimberTec. Its AI-powered software simplifies material estimation, ensuring accurate takeoffs, compliance with AS 1684, and less waste.
Ready to make timber framing easier? Give TimberTec a go and experience the difference for yourself. With TimberTec, you can focus on what you do best—building bloody good Aussie homes.
Embrace the tech with Timbertec.